
GIGABYTE
Loading…
G
- GA-Z270-HD32
- GA-Z270-HD3P2
- GA-Z270M-D3H2
- GA-Z270M-D3P
- GA-Z270MX-Gaming2
- GA-Z270N-GAMING2
- GA-Z270N-WIFI
- GA-Z270P-D33
- GA-Z270-Phoenix-Gaming2
- GA-Z270X2
- GA-Z270X-A
- GA-Z270X-A-Ultra
- GA-Z270X-Designare2
- GA-Z270X-GAMING6
- GA-Z270X Gaming 7
- GA-Z270X Gaming 7 MG
- GA-Z270X-GAMINGK5
- GA-Z270XP-SLI3
- GA-Z270X-UD32
- GA-Z270X-UD52
- GA-Z270X-ULTRA
- GA-Z270X-ULTRAGAMING2
- GA-Z370
- GA-Z68A-D3-B37
- GA-Z68A-D3H-B39
- GA-Z68AP-D311
- GA-Z68MA-D2H
- GA-Z68MA-D2H-B39
- GA-Z68M-D2H6
- GA-Z68MX-UD2H
- GA-Z68MX-UD2H-B38
- GA-Z68P-DS311
- GA-Z68P-DS3-R20
- GA-Z68P-DS3-R21
- GA-Z68XP-D34
- GA-Z68XP-UD38
- GA-Z68XP-UD3-iSSD7
- GA-Z68XP-UD3P7
- GA-Z68XP-UD3R6
- GA-Z68XP-UD410
- GA-Z68XP-UD56
- GA-Z68X-UD3-B38
- GA-Z68X-UD3H
- GA-Z68X-UD3H-B38
- GA-Z68X-UD3P-B36
- GA-Z68X-UD3R-B36
- GA-Z68X-UD4-B38
- GA-Z68X-UD5-B38
- GA-Z68X-UD7-B37
- GA-Z77-D3H10
- GA-Z77-DS3H9
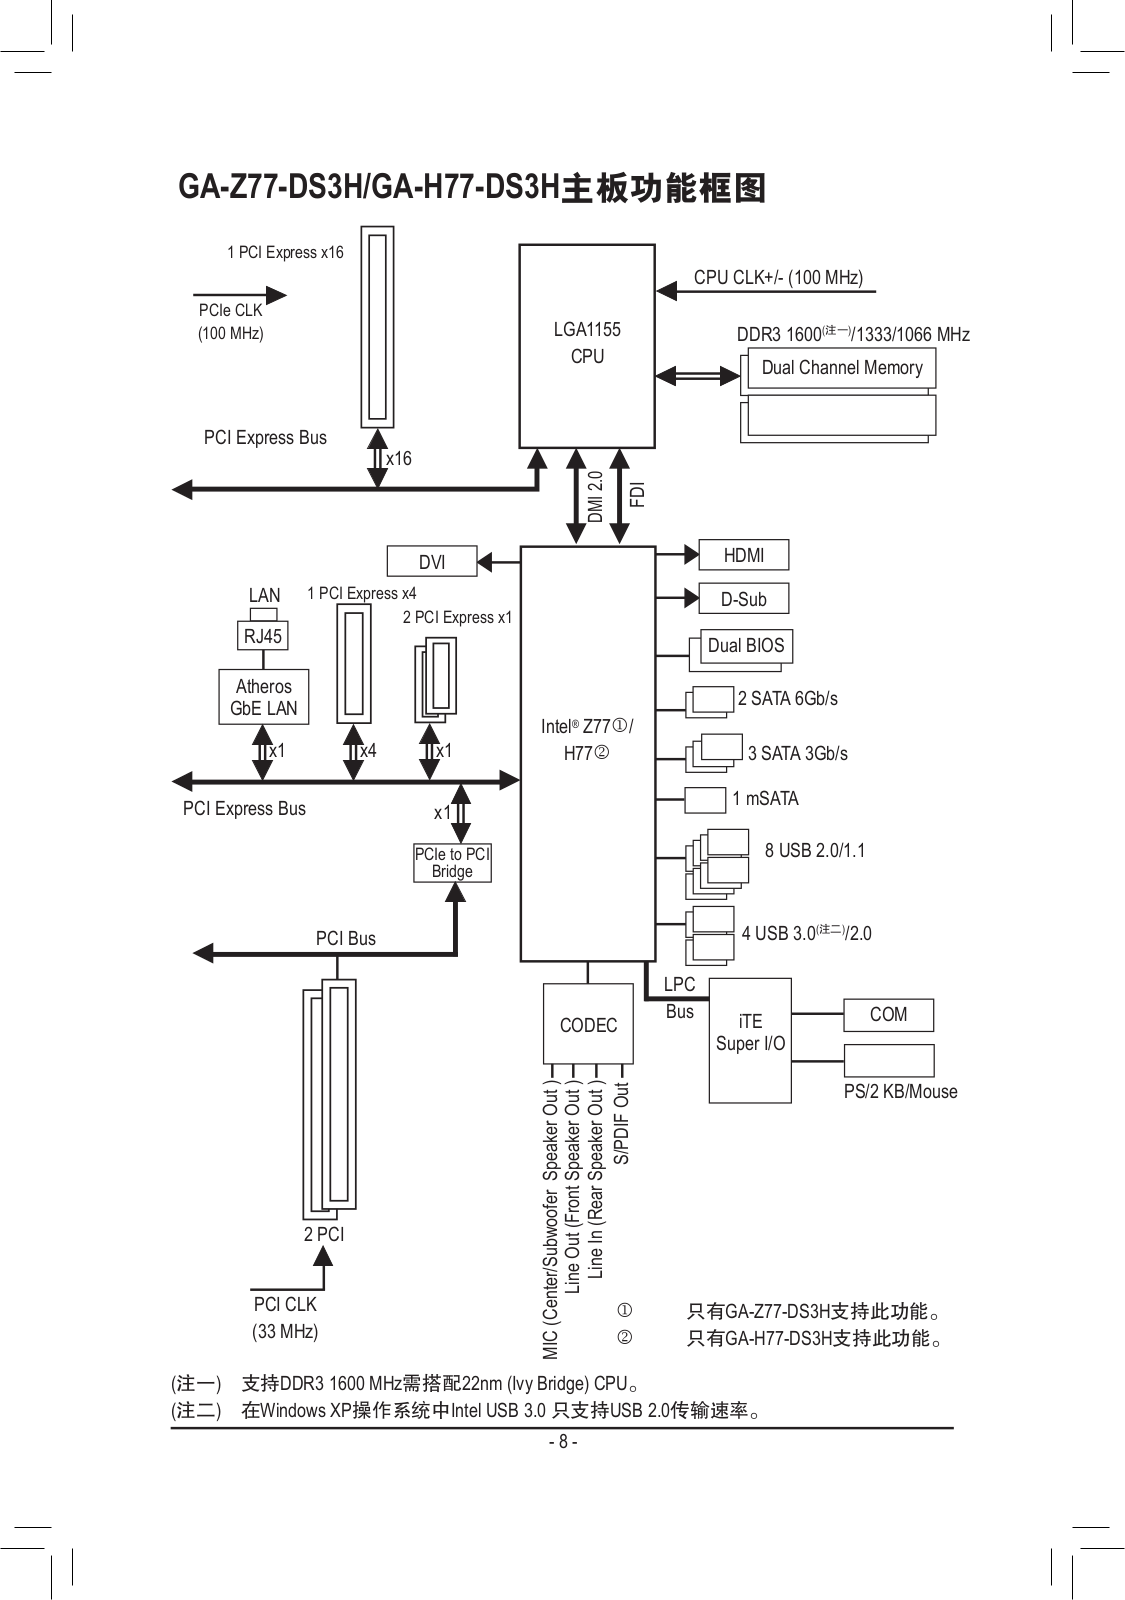
- GA-Z77-DS3H User’s manual
- GA-Z77-HD35
- GA-Z77-HD44
- GA-Z77M-D3H8
- GA-Z77M-D3H-MVP10
- GA-Z77MX-D3H9
- GA-Z77MX-D3H TH5
- GA-Z77MX-QUO-AOS
- GA-Z77N-WIFI8
- GA-Z77P-D36
- GA-Z77X-D3H9
- GA-Z77X-UD3H9
- GA-Z77X-UD3H-WB
- GA-Z77X-UD3H-WB WIFI3
- GA-Z77X-UD4H7
- GA-Z77X-UD5H8
- GA-Z77X-UD5H-WB2
- GA-Z77X-UD5H-WB WIFI5
- GA-Z77X-UP4
- GA-Z77X-UP4-TH6
- GA-Z77X-UP5
- GA-Z77X-UP5 TH7
- GA-Z77X-UP5 TH rev. 1.0
- GA-Z77X-UP77
- GA-Z87-D3H
- GA-Z87-D3HP4
- GA-Z87-DS3H4
- GA-Z87-HD35
- GA-Z87M-D3H5
- GA-Z87M-D3HP3
- GA-Z87M-HD33
- GA-Z87MX-D3H4
- GA-Z87N-WIFI4
- GA-Z87P-D36
- GA-Z87X-D3H7
- GA-Z87X-HD34
- GA-Z87X-OC6
- GA-Z87X-OC FORCE2
- GA-Z87X-SLI5
- GA-Z87X-UD3H4
- GA-Z87X-UD4H3
- GA-Z87X-UD5
- GA-Z87X-UD5H3
- GA-Z87X-UD5 TH3
- GA-Z87X-UD7 TH4
- GA-Z97-D3H7
- GA-Z97-HD36
- GA-Z97-HD3P5
- GA-Z97M-D3H6
Loading…
Loading…
Nothing found
GA-Z77-DS3H
Boardview rev.1.0
1 pgs92.1 Kb0
Quick Start Manual
40 pgs12.74 Mb0
Schematics REV 1.0
35 pgs583.3 Kb0
User Guide
100 pgs32.97 Mb0
User Guide
100 pgs31.57 Mb0
User Manual
104 pgs33.74 Mb0
User Manual
100 pgs36.47 Mb0
User Manual
104 pgs30.96 Mb0
User Manual [ja]
100 pgs32.72 Mb0
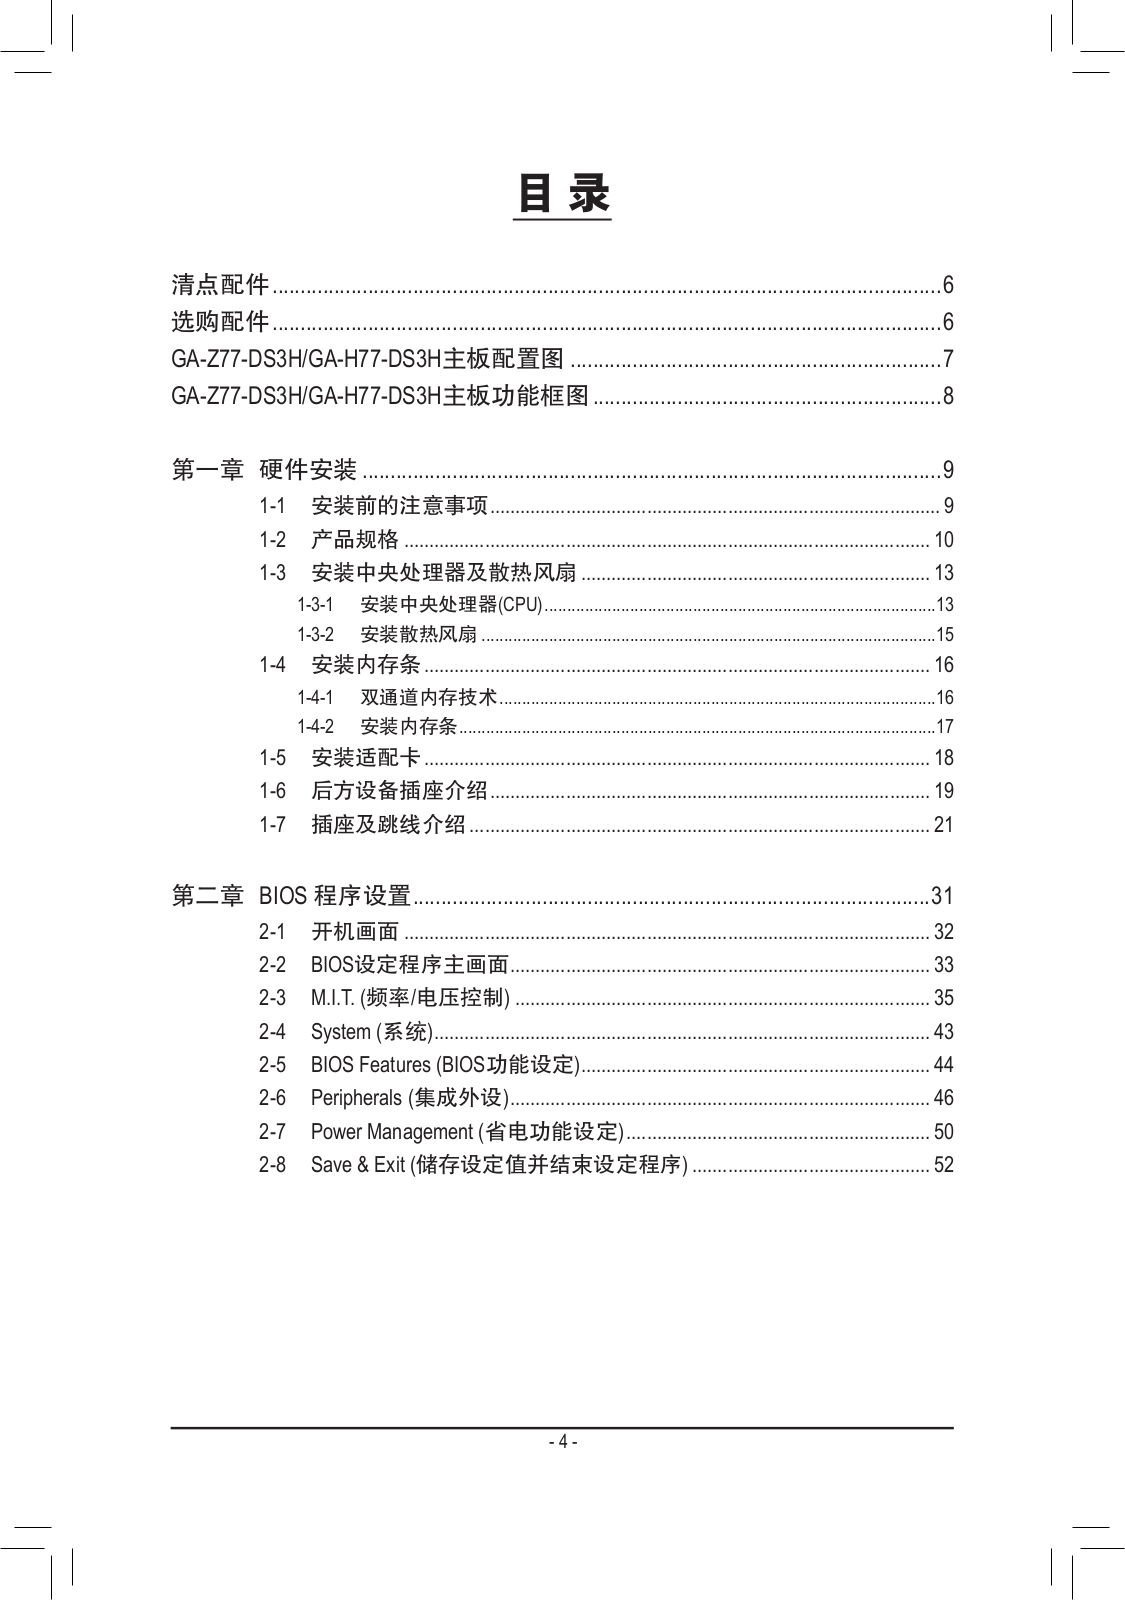
Table of contents
Loading…
…
GIGABYTE User Guide
Download
Specifications and Main Features
Frequently Asked Questions
User Manual


Loading…
+ 70 hidden pages
You need points to download manuals.
1 point = 1 manual.
You can buy points or you can get point for every manual you upload.
Buy points
Upload your manuals
- Addeddate
- 2022-01-08 22:18:09
- Identifier
- manuallib-id-2613582
- Identifier-ark
- ark:/13960/s26rn18f4r7
- Ocr
- tesseract 5.0.0-1-g862e
- Ocr_autonomous
- true
- Ocr_detected_lang
- zh
- Ocr_detected_lang_conf
- 1.0000
- Ocr_detected_script
-
HanS
HanT
Latin
- Ocr_detected_script_conf
-
0.4337
0.4337
0.1269
- Ocr_module_version
- 0.0.14
- Ocr_parameters
- -l eng+chi_sim+HanS+Latin
- Page_number_confidence
- 82.83
comment
Reviews
There are no reviews yet. Be the first one to
write a review.
53
Views
DOWNLOAD OPTIONS
Temporarily Unavailable
DAISY
For users with print-disabilities
Uploaded by
chris85
on
Intel Rapid Start Technology
A. System Requirements
Windows 7 with SP1 1.
An SSD with size larger than the total system memory2.
Intel Rapid Start Technology enabled in BIOS Setup3.
AHCI/RAID mode supported (please note if the SSD has been assigned as a member of a RAID array, it 4.
cannot be used to set up Intel Rapid Start store partition); IDE mode not supported
All motherboard drivers correctly installed5.
B. Creating a Primary Store Partition
Below it is assumed Windows 7 is already installed on the SATA hard drive.
Open Disk Management Tool
Step 1: Go to Control Panel > System and Security > Administrative Tools > Computer Management >Storage
> Disk Management.
Step 2:
Select the SSD on which you want to create the store partition (if the SSD is unallocated, create a
new partition rst), and right-click on the partition you select and select Shrink Volume. (Figure 1)
Step 3: Enter the size of the required partition (it should be at least equal to the size of the memory
currently installed on the system. (1 GB=1024 MB. For example, to set 8 GB, enter 8192 MB). The
recommendation is to create a partition equal to the maximum memory capacity supported on the
system, in order to take care of future memory upgrade scenarios.)
Step 4: When completed, click Shrink. (Figure 2)
C. Launching DiskPart Disk Partitioning Tool to Set up Intel Rapid Start Store Partition
Open the command prompt window and run diskpart.exe (enter «diskpart» at the C:\> command prompt
and press <Enter>). At the diskpart prompt, type the following commands in sequence. Note: The commands for
MBR format and GPT format are different. Refer to the commands below. After entering all of the commands,
be sure to restart your computer.
MBR format:
DISKPART>list disk
(Lists the disks and information about them)
DISKPART>select disk X
(Selects a disk. «X» is the disk number where you
want to create the store partition. Refer to results from
«list disk» for the exact disk number)
DISKPART>create partition primary
(Create the primary store partition)
Figure 2
Figure 1
Manuals.eu
- Manuals.eu
- Gigabyte
- Computers & Peripherals
- Mainboards
- Socket 1155
- Intel Z77
- GA-Z77-DS3H (rev. 1.1)
- Manual
×
1
2
3
4
5
6
7
8
9
10
11
12
13
14
15
16
17
18
19
20
21
22
23
24
25
26
27
28
29
30
31
32
33
34
35
36
37
38
39
40
41
42
43
44
45
46
47
48
49
50
51
52
53
54
55
56
57
58
59
60
61
62
63
64
65
66
67
68
69
70
71
72
73
74
75
76
77
78
79
80
81
82
83
84
85
86
87
88
89
90
91
92
93
94
95
96
97
98
99
100
⟨
⟩
Copyright © Manuals.eu
Agreement
Privacy Policy
Contact us